Acer K330 LED projector repair

This article is about one of my recent spontaneous projects. A few days ago, I got lucky on an ebay auction and picked up a broken Acer K330 projector. I often look for these kinds of offers because I have spent several years in the audio/video repair business and am pretty confident in my skills when it comes to fault-finding. So I figured, saving some money by restoring a broken device couldn’t hurt.

IMG_0592
Fig. 1: Acer K330 power supply and optical path.

First some facts and features: The K330 uses a three color LED module, which promises a long lifetime and low energy consumption. A Texas Instruments DLP module handles image generation. In sum this lets me hope for good contrast and strong colors, even if the brightness of 500 lumens doesn’t seem that much. An interesting thing about this DLP chip is that it uses an uncommon diamond pixel grid for size reasons. Diamond in this context means that the pixels do not form a rectangular pattern like in the usual TFT monitors but rather a grid of 45° rotated and slightly squeezed, not completely rectangular tiles. Of course, this means that internal resampling has to occur to map the image from the rectangular domain onto the diagonal domain of the IC.

So, this projector was obviously broken when it arrived – what a surprise. The seller had already informed me that it had suffered from overvoltage of unknown cause. The VGA picture was supposed to be very green-ish, the HDMI input dead in whole and the media player erratic. A slight flickering in the picture was also mentioned. I’ll take you through the repair process for this device from here on. Continue reading

Repairing a remote car key

I’ve had this lying in a drawer for some time, it stopped working from one moment to the other. Imagine unlocking your car, driving around some, and then being unable to lock it again. Good thing that mechanical locks are not totally uncommon. I still had one remote in spare though, and together with a bought new one the set was complete once again. To be precise, these are pretty old models (’94-’96) made by Volvo and cost some 40 Euros or thereabouts. I would guess that is pretty much the same for each car manufacturer, as are the inner workings.

All was well until another key broke down – same procedure, different day. Maybe static electricity was to blame, I don’t know. But it made me wonder if it could be fixed – so I cracked it open.

Volvo remote key
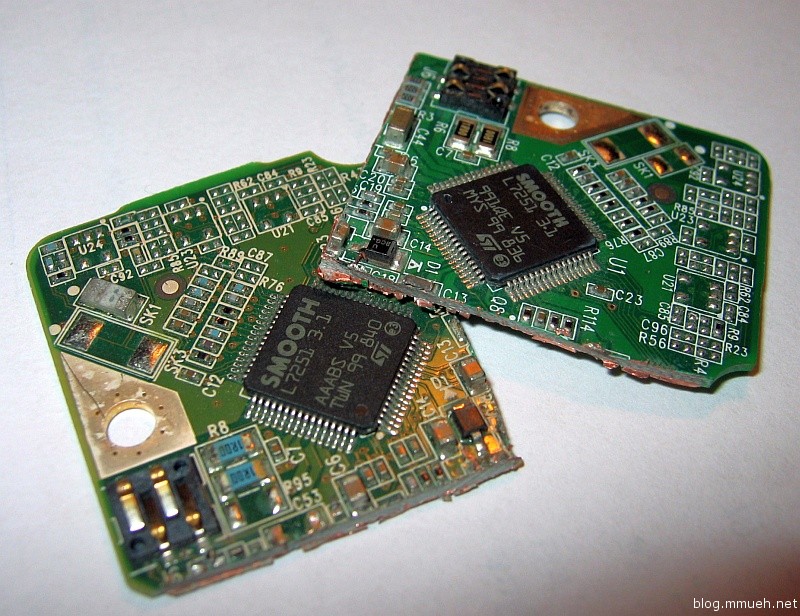
This picture was taken after the repair, which explains the flux residues ;-). The circuit you are seeing can be identified using an EPCOS resonator AppNote linked at the bottom of this article. The resonator (marked in picture) is a S+M R701, manufactured by Siemens Matsushita Components, a joint venture that later brought forth EPCOS. While there are other manufacturers like RFM, these models seem to be a pretty common brand for such keys as far as I have seen. Inside the metallic-ceramic casing is a parallel LC resonance circuit which has been precisely trimmed for a specific resonant frequency. The current types are mostly pin compatible to the old ones.

Just in case: Those resonators cost you a few cents at Farnell, but I would guess Digikey also has them. Use the datasheets to get the correct one for your frequency and pin layout. They are a real pain in the ass to solder by hand! But, to be fair, they were not really designed for it. Use hot air or reflow techniques if you can, or else heat the ground plane from the side, OR remove the resonator by applying a small amount of solder to the case top and heat it up completely. Take care not to rip the copper traces off the pcb, as the glue keeping them there becomes flexible when overheated. To solder on the new one, place it onto the cleaned pads and flow solder underneath the pins from the side, for each pin individually. Do not heat the resonator for too long. I did it like this twice, but as said – pain!

A good place to start is the EPCOS R920 resonator.

As I found out later, the resonator was perfectly working. I swapped it anyways – even swapped the old one back once I found the error – to make sure, but the real culprit was the HF output transistor which I have marked in the lower left.

How it works, in easy words: The signal generated by the microcontroller is a digital pulse signal containing the remote code. This signal is fed into the resonator through a resistor and a capacitor, and from the resonator back through said capacitor to the base of the output transistor. The resistor limits the output impedance of the controller pin to prevent it from clamping the transistor base to a fixed voltage and allow the resonator to overlay an AC component onto the DC voltage. Now, as the resonator…well…resonates at its designed frequency, excited by the impulse coming through the capacitor when the controller pin turns ON, the resonance waveform is coupled into the base of the transistor, which in turn amplifies it and pushes it out onto the antenna. Imagine repeatedly hitting a tuning fork with a small hammer and touching it to stop the vibration in a certain pattern while picking up the generated sound with a microphone to amplify it.

What you get is a high frequency signal during each high-level time of the remote code signal and no signal during each low-level time. This is called OOK, or on-off-keying. It can be seen as an extreme example of amplitude modulation (AM), and the principle is identical to the way TV remotes work – only that RF is used instead of IR light. There is a lot more theory behind this, you can look it up in dedicated books about high frequency circuits and transmitter circuits. As for this circuit, have a look at page 6 of the AppNote linked below. It features a standard circuit that very closely resembles my remote key, plus a detailed function explanation.

Back to the repair – checking the original transistor with a standard multimeter showed proper diode behaviour (meaning it was a bijunction npn or pnp transistor), but this is not always sufficient for a diagnosis of a working device in HF circuits. The output to the antenna (the copper strip along the left edge) appeared near-zero and the pulse signal after the coupling resistor was pretty deformed, too. With some remote keys you can test the RF output by holding a radio scanner set to 433,92 MHz or whatever frequency the key uses next to it and listening for pulsing tones/noise upon a key press. If you don’t get any response, you are either unable to hear the specific modulation (uncommon, as the modulation is pretty slow to ensure good reception) or the transmitter is (still) be broken. In the end, you probably have to find out by trial and error. Owning a GHz scope greatly simplifies the task, of course. I don’t, so I’d advise you to first swap the transistor and then the resonator. R/C/L are pretty uncommon to fail, whereas the transistor is sensitive to static electricity like most semiconductors. What you can measure, though, is the pulse signal from the controller.

Now, to get a suitable replacement, you can either buy a transistor that works for frequencies up to above the operating frequency of your device and has the same pinout – or you can simply go look for a cheap remote controllable wall socket, wireless weather station or the likes. Whatever you choose should use the same frequency, of course, and run on batteries. The probability of finding a suitable transistor inside such a transmitting device is very high. This will be the one nearest the feeding point of the antenna, like in the picture above. You’ll need to confirm the pinout by looking into the circuit or searching for a datasheet by the SMD marking on the case – if present.

I had to try two different transistors, the first one was probably already dead before transplantation (I already wondered why I never used that remote control). A second one worked like a charm! I have noted the designation of the found replacement in the picture above. The last thing to try is the range, but there is not much to gain with only about 3V of operating voltage – ideally, you’ll get whatever range the key had before. If the range is much less, the transistor is most likely not up to the job.

Remember that most car keys “forget” their assigned codes upon battery removal. You will need to reassign the key to your vehicle according to the proper method designated by the manufacturer.

Links:

You’ve got mail!

Two days ago, a small package arrived on my doorstep after 15 day’s worth of travel. Straight from China, 5 pc. of the L7251 spindle/VCM driver (remember the bad harddrive?), sold by Shenzhen Drivestar, who have a very friendly and competent customer service. Thanks again! I figured replacing the chip was the best option, looking at the chances of success.

L7251Well what do you know. After soldering in one of these, the little sucker spins again. It is not accessible, yet, but this is definately progress! Even the o’scope shows perfect waveforms at the motor terminals, but listening to the clicking and squeaking noises I’d say something is wrong with the heads.

After investigating a little further, I spotted the central problem: The drive has suffered a triple headcrash, meaning three of its trackheads have touched the disc surface prior to the fault and were literally ripped to shreds – but in the wrong direction! The head assembly was bent and got stuck near to the platter edges, *almost* in the standby rack. Something prevented it from getting there, as it should automatically move and lock there as soon as the disc loses power. My best guess is that the disc stack rotated against its normal rotation direction, which can happen if you carry the drive.

To explain: Normally, the heads would create their own air cushion using the movement of the platters and “float” over the surfaces during operation. While the platters are motionless, that cushion is not present and therefore there is friction between the surface and heads – and any motion of the platters is also directed at the heads. For that reason, the heads have to be parked before the disc slows down too far. Usually, some kind of mechanical tensioner handles that part. It also ensures that the head assembly never moves freely while the drive is stopped.

The resulting braking force during spinup probably caused the controller to fail, and after repairing that part, the disk spun and pushed the head out of the platter spindle.

To sum it up, it is very likely that the surface of the lower platters is severely damaged, and even if not – the only way to undo this is to mount a new head assembly. I will look into this a little further, but for the moment that’s just that until I get around to building myself a small “clean room box” for repairs on discs and displays.

Harddisk troubles

Somehow I managed to get a little work done last night (2AM), so here’s the story about the harddrive:

Some time ago, a friend dropped a dead 1TB harddisk on my workbench. It was installed in an brand new external disk enclosure and had signed off as soon as it was loaded with data. Eeek!

His first attempt was to write to the manufacturer of the drive and ask for a replacement PCB – some companies do it and in most cases the PCBs can be simply exchanged if the revision numbers are identical (they MUST be if you don’t want to risk even more data loss). In this case, they only offered him to exchange his drive for a new one. That would have been fine except for the data being lost.

So, I offered to take a look at the device. After plugging it in for the first time, I immediately noticed that the BIOS could not recognize the disk at all – it even hung during disk ID-ing, which is a strong sign of the drive controller not grasping what the heck is going on anymore. Meanwhile, the disk itself made beeping and whirring noises, followed by sharp clicks. As I could not hear the distinct noise of the spinning discs, I figured the spindle motor controller was a nice place to start off.

Current harddrive PCBs (WD10EACS in this case) consist  of two main function groups which are fully integrated into generic ICs or ASICs, meaning application specific integrated circuits.

PCB of WD10EACS
WD10EACS circuit board

The ICs in the red area are the buffer and the main controller. This chip contains the whole intelligence of the disk. SMART programs and everything regarding data organization or transfer runs in here. The buffer IC temporarily stores the data being written/read while it has not been processed by the head mechanism or sent to the pc. I also marked some other important stuff on the PCB along the way.

The green area is what makes your disk spin. The spindle/VCM driver IC (STM SMOOTH L7251 3.1) generates a three phase motor drive signal for the platter spindle and moves the arm according to the main controller’s wishes. You can find a datasheet on the web, but it is for the predecessor L7250, which is similar in function but not in its pinout.

Now, what most people don’t realize is, how complicated harddrives are. They have full onboard diagnostic programs (which are VERY poorly documented of course, and these well-protected secrets are what makes data rescue companies so special) and even though they look simple on both outside and inside, they have to be precisely calibrated for optimal performance. Hence the need for exactly matching PCBs. But, since this case has all indications of hardware failure, no diagnostic program will fix the damage.

Motor drive testing in this case is best done with the drive board unscrewed from the disk. This will eventually increase the “failed start” SMART counters in the disk’s long-term memory, but whatever – it’s busted anyway. The reason for unhooking the board is that the motor coils, if not defective, present unknown resistances and inductances between the drive outputs and make your measurement extremely difficult. After connecting the four probes of my digital scope to the spindle connector, I started sampling and plugged the board in…

Scope screenshot for HDD drive signals
Scope screenshot of motor phases

…and this is what happened. Excuse the poor contrast, I usually only use white backgrounds when printing, to save toner.

What you see is the main startup algorithm doing its job. The controller first tries to find out what position the rotor magnet in the spindle motor is in, so it can generate matching signals for rapid acceleration. It does that by applying voltage to the different coils in changing combinations, following a pre-programmed pattern. After measuring the current rise-time for each combination, it can calculate the magnetic influences in the motor coils and from that the actual motor position. To explain the different traces, yellow blue and green are the actual three phases and the magenta-colored trace shows the center tap which is not present right now, since the motor is not connected. The phases are switched against the rail voltages by MOSFET half-bridges integrated into the IC.

I marked the important part in the graph – the yellow phase is missing something on the top of its waveform – there should be short high-pulses like on the other two. The controller notices that and tried to restart the process at the red mark. After failing twice, it decides to try and spin the disk some. This is called coarse drive mode, the visible pulsing is not meant to spin the motor to a certain frequency but rather to just turn it in case the motor is “stuck” in a non-discernible state (even though that should never happen). This part of the signal is responsible for the whirring noise as the motor actually moves, but poorly so because of the missing high level on one phase.

The next step will be to either find an exchange for the driver chip since I can’t find a matching PCB, or find  a way to replace the internal MOSFET bridge of the drive with an external one. If anyone knows where to get the actual L7251 3.1 datasheet, I’d be grateful for a hint.