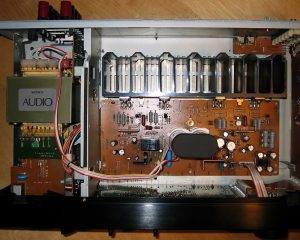
These are just some short notes I took while inspecting an aged Sony TA-F220 amp some days ago. I have seen several of these over the last years, pretty decent amp with a nice sound. They all have some regular aging flaws in common, though.

First, download the service manual. It is freely available from eserviceinfo.com or elektrotanya.com. Also, I will not go into details about the disassembly & reassembly of the amp, this should be pretty obvious. The manual contains explosion drawings and some more hints can be found printed onto the solder side of the preamp PCB.
As always, sufficient knowledge is implied. Remember to keep your fingers in the right places and the device unplugged while working. There are many open line voltage contacts near the fuse that can be easily touched by accident.
Errors & solutions
Amp turns off completely when reaching higher levels, sporadic, DC relay clicks off.
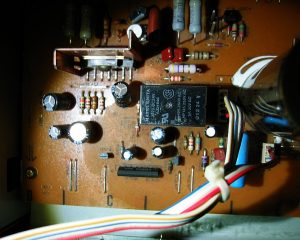
This is a fault that can be found by sight. Looking into the case (Fig. 2), a big, circular, wet looking spot can be seen in the front left corner of the main PCB.

The spot is caused by a bottom seal failure of the C703 220µF electrolytic cap in the center of the picture, just below the relay. Logical analysis of the schematic also helps to identify this part, I found it this way even before I noticed the dirty PCB.
After ruling out the overload protection as the cause by simply shorting the corresponding pin (#1) of the protector IC to GND (see datasheet of µPC1237HA for details), I tested the DC protector the same way. When shorting the pin (#2), no shutdown occured. On the contrary, I could not measure DC at the outputs (before relay) while in shutdown, but some DC-ish signal at the protector input. The reason is the following:
A capacitor is a frequency-dependent impedance Zc(f) (low f -> high Zc, high f -> low Zc). In this case, it is connected in parallel to the input of the protector IC and works as a lowpass filter together with the series resistances in the sensing lines (several K-ohms). For low frequencies, the voltage drop across Zc is larger than for high frequencies – that’s just basic RC filter theory.
If the cap becomes defective – which is usually a creeping process for electrolytics – its low impedance region will begin at higher and higher frequencies the more it degrades. This increases the filter edge frequency, letting more and more low-freq. components through to the protector IC input where only true DC components should arrive. In consequence, low frequencies of sufficient level in the audio signal will trip the DC protector. The error will grow more and more pronounced with continuing deterioration of the cap. Replace it by an equal or higher rated one (voltage/temperature/ESR depending on usage scenario, not capacity!). In the case of the F220, the original part seems to be a bit underrated in terms of voltage (only 6.3 V).
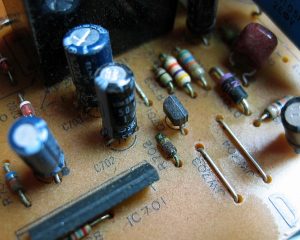
Oh, and clean the board if the cap leaked. A Q-tip soaked with a mixture of water and alcohol is a good choice for cleaning electrolytic fluids. The mess needs to be removed as the electrolytic sometimes shows corrosive behaviour. Hell, you don’t want anything fluid in the circuit, conducting or not. You can see the effect in the next picture below (Fig. 3), look at the resistor in the center.
Amp loses one channel from time to time, mechanical shock or turning it off/on brings it back.
Dirty relay contacts. The contacts are usually silver-plated to enhance their contacting ability. Unfortunately, this has the big downside of being a good medium to oxidize. The dust cap of the relay can be taken off, but I don’t recommend cleaning the contacts as they are too fragile in the original part. The durable solution is to replace the relay. 24V coil voltage is required, and Sony has made this easy by providing through-holes for two different relay footprints. You can barely make out the different marking in the top left of the following picture.

Crackling, noises, etc.
The usual problems with old amps: Consumer products almost always develop bad solder joints. Typical weak spots in this amp are: Input RCA sockets (Fig. 4a), output binding posts (Fig. 4c), the connector between the preamp board on the right and the front panel (Fig. 4b, solder joints are on the front panel). Also check the underside of the main PCB by sight, but usually this is ok. Check any parts that appear heavy and might move a lot when the case is handled, heatsinks, voltage regulators, large resistors, connectors. If in doubt, reflow the solder with some flux.
The other part are the switches. These are also silver plated, and they develop hard oxides. Cleaning sprays like Contact 60/61 have never helped me here as the oxides are too baked in, so I always unsolder the two channel select switches and the speaker selector and open them up. This can be done by carefully uncrimping the metal tabs keeping them together and taking them apart while memorizing (!) where the four contact blades go. After cleaning the contact strips with a special silverware cleaning fluid (NEVER USE ABRASIVES HERE!), I apply a thin layer of grease to keep oxides out. Then the contacts are closed and re-crimped again. I admit that this is more for the mechanically gifted, but it can be done. Unfortunately, I forgot to take pictures. Yikes, not going to redo that.
The volume and tone control pots are mostly not to blame for this. The quality is decent even if they are not dust-proof. If a mild crackle is present, turn the knob over the crackling section very fast 20-30 times and it will eventually smooth out. Potentiometers can generally also be disassembled and cleaned, but you risk destroying a part for which you might not get spares. Also, cleaning has rarely kept the problem out for long.
Another hint towards the end: When loosely placing the main PCB into the case for testing, always insert the center screw that makes contact to the central ground metal ring contact. The amp will not turn on if this is disconnected ;-)
In this case, that was all. On another occasion, I worked the sister model of the F220, the F120, which was completely dead. If so, check the two fusible resistors R801/R802 first. They are pretty well hidden and the F220 does not have them. Sometimes they will simply blow, probably because of insufficient airflow. Just take care that you replace them by suitable spares! Fusible resistors are special types that will specifically open on fail, and will not produce a flame. Many producers still make them, but they are mostly only available at Farnell, Digikey, etc.


Hi Mario, thanks for the interesting read.
I have a F220. When I first bought it second hand 7 years ago it worked pretty well, then the B speakers stopped working, then A started failing and I would have to turn the input selector quickly for the sound to come back. At this point, the amp turns on but I can’t get any sound out of it! Do you have any idea of what might be at fault in my amp from this description?
I have opened it and I cannot identify any leaky capacitors. My plan is to change the relay, then check for bad solders, but I wonder if there is something else I should absolutely check.
Thanks a lot again,
Clara.
Hi Clara,
from the gradual failure, that sounds like contact oxidation.
I’d say what you tell me about one, then two speaker pairs no longer working hints heavily at the relay(s) – so you should be on the right track. Might be necessary to use some technical spray. Do not skip the solder joint check though, a bad solder can behave like an oxidized contact (well, it is…). I had such a case a few weeks ago where a part unsoldered itself but stayed in place, and would occasionally work fine and then not at all the next minute.
If you feel that the problem becomes significantly less annoying for a while after you turn the selector several times, then it could also be the selector contacts. Before disassembling these, you can try to get some spray into the mechanics and work the switch for a while.
Also, do you hear the audible “click” from inside some seconds after you turn on the amp?
Feel free to share anything else you find – I’ll give an opinion as soon as I have the time :-)
Hi Mario, i changed the relay of amply TA-F120. Now the ampli is operating, but i have only a small problem: every 5/6 days only the left channel go down. I have to switch off/0n the amply and then it operating correttly. Do you have some advice for resolve the fix? maybe i Have to change the C703?
Thanks in advance.
please can you send me your answer on my email:gdisimone@gransolarghella.com
BR Gianfranco
Hi,
Got an F120 and the problem is the receiver turn immediately off when its powered on. The R801 R802 resistors are having the specified when i’m measured values(120ohm,470ohm). I saw two capacitors that may be leaked.c602 and c605. Can be them be my problem ? What shoul i look into? Should i clean the relay or replace it ?
replaced the suspicious capacitors nothing. Shorted the cicuiut to leave out the power switch if that’s the faulty one but not either this got me working the amp.
Hi,
by “turns off” you mean the relay switches off? In that case (assuming all main voltages are present according to the service manual) either the output carries a DC offset or it is overloaded. Since the latter is probably not the case, you should check the DC offset of both amp channels before the relay contact. If there is an offset, the most likely cause would be a blown power transistor in the corresponding channel.
The nasty part is that the protect circuit not only disconnects the speakers, but also disables the front panel LEDs even though the circuit is still powered, so you have to check inside.
Edit: You also might want to check all the fusible resistors, like R803 or R804, which might be installed depending on your version. If you have to replace them, take care to use metal OXIDE resistors only, since others are mostly not rated for “open circuit on fail” and are not flameproof.
Dear Mario,
Fantastic blog! I just recently pulled out my old boyhood stereo rack from the attic and remembered why I put it there in the first place – the relay of my Sony TA-F220 amp was clicking away, spoiling any joy after 10-15 minutes…
Then after looking for repair tutorials online, I stumbled over your detailed and descriptive blog, which gave me the confidence to think that I can fix this myself even with my minuscule soldering skills! The next challenge is to find a suitable relay and was wondering if I could ask if you think the Omron mentioned in the following link could be a good match? http://cmaniac.blog11.fc2.com/blog-entry-415.html
Thx in advance!
Hi Bjarke,
of course you may! According to the datasheet, the type mentioned in the linked post (OMRON # G4 W2212P-US-TV5) fits both in specification and pin layout. I am guessing that’s the one, since I cannot read the japanese content ;-) Anyways, I never looked up replacement types because in my case a few specks of dust were easily cleaned out. The speaker selector switch was the much more troubling part due to the heavily oxidised silvering.
Before removing the relays, I would also recommend you get a simple manual desoldering pump if you don’t already have one. Much more uncomplicated compared to desoldering wick on large contacts.
Regards, Mario
hi
your article about sony f220 is very good. i would like try to clean the relay. Please, can you explain in detail how to clean the relay? i tried but the cap of the relay is blocked. How can I unblocked the cap of the relay?
BR
Gianfranco di simone
gdisimone@gransolarghella.com
Hi,
sorry for the late answer, I was away.
Unfortunately I do not have detailed photos of the relay left. If I remember correctly, the relay has a cover part which is wider than the base and slides over. It is then held by two latch pins on the longer sides of the case. To open it, you have to push from both smaller sides such that the wider sides bend outward. If you force it towards one of the longer sides at the same time, one of the two hooks should come off and you can carefully remove the cover completely.
Hope that helps!
For cleaning, I use a piece of stiff paper which easily fits between the contacts. I then slide it in and lightly push the contacts against it while sliding the paper back and forth. For really dirty contacts, a bit of alcohol or plastic polishing paste can help. Not too much though, since it will erode the silver or tungsten plating. The contacts have to be perfectly residue- and dust-free afterwards, so use a clean piece of paper for the final cleaning and blow remaining lint from the paper out with pressured air if possible.
hi, thanks a lot for your answer. Hi decided to change the relay, but can you explain in detail where are holes for the second relay?
Thanks in advance, Gianfranco
Hi Mario,
Sorry for the very late reply – forgot to post a response! Just wanted to say that the Omron relay works great – perfect fit, no more clicking or turning off anymore and a very easy fix. So if anybody has problems with an amplifier clicking and turning off by itself, I would change the old relay with a new one ASAP.
Now I just have to build up the confidence to someday address the occasional crackling & noises = cleaning the switches! *gulp*
Thx again!