Now that a communication with the STM32 has been established, it’s time to start checking out the data exchange a bit more. From Jaro’s notes (see references in part 1), many of the most important IDs are known already. However, I suspect that there’s more to that. For example, it appears that the app can display the filtered air volume rate, which means that either the value itself or some kind of motor power or RPM value should be available. Looking at the ID scheme also brings to mind that there are a lot of spaces that can be filled between the known commands.
Continue readingImproving a Xiaomi Air Purifier 3H (1)
I bought this used broken unit after covid, not really to solve any air problems but because I found the integrated sensors pretty interesting for the price. The Xiaomi air purifiers operate on a laser particle sensor to measure air quality, combined with a Sensirion SHT temperature/humidity sensor. The data are available over wifi via the smartphone app, which is rather not to my liking – especially hooking up such a reportedly unsafe ([4]) device to my network. That is something I wanted to change, along with fixing the motor. Well, a lot of time has passed, but now it’s actually happening.
I’ll try to add to the others’ knowledge wherever I can. I am currently writing my own custom software for the ESP32 with the aim of integrating the 3H into an MQTT ecosystem, but keeping out overhead like ESPHome or Home Assistant. I’ll push that to Github in the next few days when it’s finished – more to follow here. The code is written for the Espressif IDF toolchain, to be compiled in the Eclipse IDE. It uses standard libraries or openly available ones wherever possible, but also builds on Jaro’s code for the communications part. At a later point I also want to dabble at replacing the STM32 code. I should mention that this post series is not about dumping or modifying any original code or data, or about anything related to the cloud link, since all of that is most likely a waste of time. I’m not going to keep any linkage to the original cloud/app, but for the time being successively replace parts of the functionality – which requires me to figure out how things talk to each other.
Continue readingAvantek AIL 230186 YTO
At last summer’s Ham Radio in Friedrichshafen, I was offered a YIG-tuned oscillator at the suspiciously generous price of 5 Euros. Since I’m always on the lookout for cheap instrumentation-grade YTOs, I took it without a second thought. After a brief chat with the friendly operator who sold it, I learned that it came from a recently discarded HP spectrum analyzer, which appears to have been beyond hope. However, he claimed that the oscillator worked ’til the end. Should he read this: thanks for the chat, and for the part :-)
A few months later: Grabbing a spectrum analyzer and a bunch of power supplies shows an indeed very healthy part.
Continue readingReusing a Jura LED dot-matrix display
Yes, this is about fancy displays – again. I have been wondering for a while whether it could be simple to repurpose the LED matrix displays often found in Jura coffee machines. Mounted behind tinted plastic they give the front panel a distinctly premium look. Coincidentally, they look highly similar to the Osram- and Avago-made PDSP/HDSP intelligent dot-matrix module series, which is what I was initially expecting to find when pulling apart the control panel of a scrapped Jura Impressa C9. Let’s just say the expectation was pretty far from the mark.
Running a EL640-400 TFEL display off the RPi native DPI/VGA interface
Following several somewhat successful tries to bit-bang VGA signals for TFEL displays I have moved to the integrated native display parallel interface (DPI) of Raspberry Pi models 2 and later [1][2].
By using this GPIO drive mode it is possible to offload framebuffer output to the hardware, which brings speed and saves a huge amount of CPU resources compared to bit-banging. This interface is frequently used for outputting VGA signals, since it is one of the original display signal output methods of the Broadcom CPU for driving parallel TFTs or LCDs. Obtaining analog VGA from it requires a resistor ladder DAC board [3], which combines the individual digital bit signals to analog multi-level RGB signals. In the case of a TFEL display this is not necessary, since the control circuit accepts digital level VGA. However, the clock mode is a bit unusual compared to the common configurations (as explained in previous posts: required is a 640×400 pixels, >70 Hz, monochrome signal).
Continue readingSamsung SSD resurrection
Yesterday, a discarded Samsung SD863 datacenter SSD found its way to my hands. Although a bit older – this one’s from 2016 – these are supposed to be quite reliable (except for a few rumoured firmware bugs), and 480GB of capacity are not to be disregarded even at today’s remarkable flash prices. Since it did not suffer from the usual drillholes of unreadability, I hooked it up to a linux machine – hopefully immune to virus-infected, supposedly “lost” thumbdrives – to give it a try. Unsurprisingly though, the drive announced 1GB of capacity, which does not fit its type MZ7KM480HAHP and explains its disposal. I had a hunch that the reason might lie with the microcode:
ata6.00: ATA-9: SAMSUNG MZ7KM480HAHP-00005, ERRORMOD, max UDMA/133
...
sd 5:0:0:0: [sdd] 1965352 512-byte logical blocks: (1.01 GB/960 MiB)
ERRORMOD as a version index looks rather like something went horribly wrong, causing some kind of corruption to the firmware. At least it still communicates through SATA, which indicates some backup capabilities.
Continue readingNew layout
As of 16th of July, this site is delivered in a new layout, which *should* be mobile-compatible. The old theme’s backend has become too messy over time due to a lot of hacks I added. I still need to restore some parts of the old design though, so there will be some more change over the next few weeks.
Enjoy!
TFEL on Pi3B
Recently I found some time to move my TFEL driver onto a spare Pi3B to test its performance. First, it still compiles fine on Archlinux ARM 4.14.87 and the GPIO layout is compatible.
Continue readingVOLVO 850: Broken speedometer
Recently, the speedometer of my trusty old Volvo 850 station-wagon started acting up. Initially, it would just drop to zero intermittently at speed, then come back. Hard to notice if you only so much as glance at it every now and then. Over the last two weeks this got worse such that it would only very rarely do anything at all. My best guess for the cause would have been the speed sensor at the vehicle underside, but for mysterious reasons the odometer was still going at the normal pace. According to the instrument schematics, this should not be possible if the sensor were broken – same signal for both. Continue reading
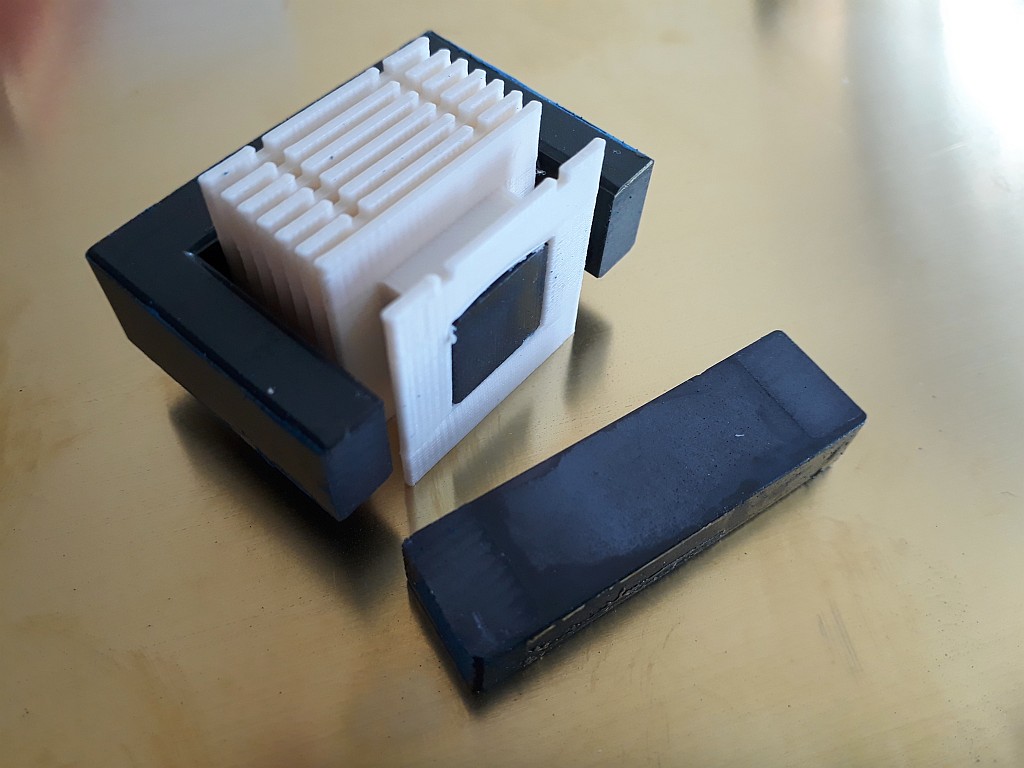
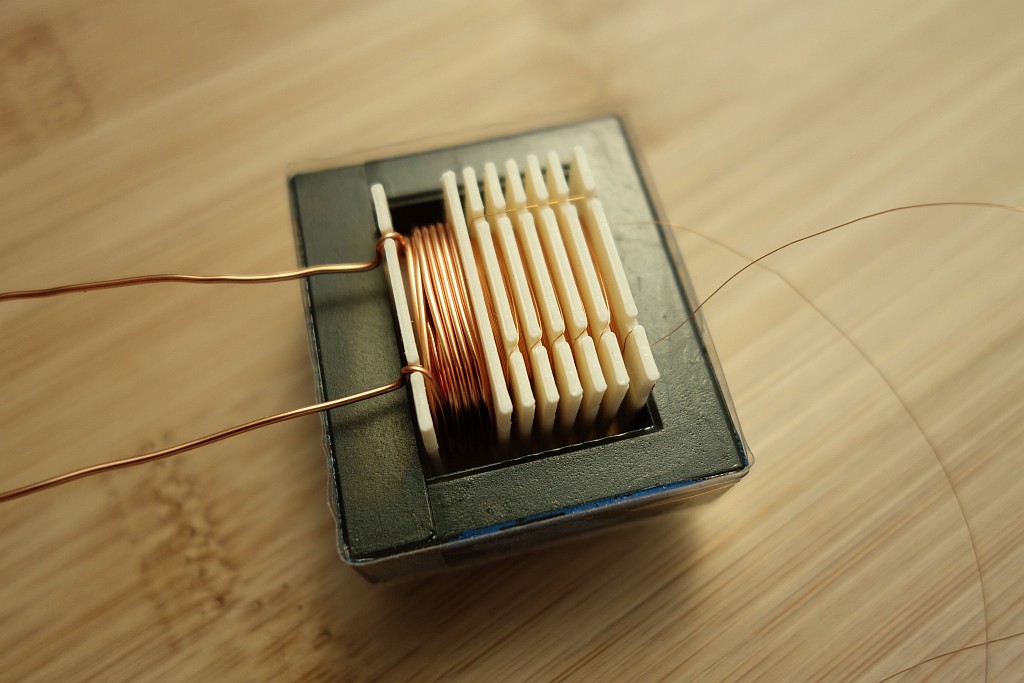
3D-printed transformer bobbin
Getting a fitting transformer bobbin for ferrites is not easy under normal circumstances, but even more so for cores of unknown type. Usually, the dimensions follow a somewhat standardized pattern, but then your application might demand for separate winding chambers or mounting aids which are simply not available to the standard customer. So why not 3D print it?
The motivation is to use an old ferrite core for a high voltage lab supply. It will be driven far below its theoretical maximum spec as I only know it came from a ~50W power supply. My design (a flyback converter) requires a single winding in single-ended mode for the primary consisting of 23 turns, and a secondary of 235 turns capable of withstanding roughly 1kV. For winding I use standard enameled solid copper wire of unknown brand, which will probably not survive the full voltage. As a solution, I want to separate the secondary into 6 compartments of 40 turns each to reduce the maximum possible voltage between two neighboring wires to a maximum of 166V, which is well below the breakdown range. Without compartments, the left-to-right-to-left layer winding – which will occur somewhat naturally – may cause turns with extreme voltage difference to end up touching, leading to arcing sooner or later. To additionally strengthen the winding, a soaking resin could be applied.
Using the dimensions of the core as a base, some modeling in Tinkercad yielded this:
|
|
|
|